Managing Source Code
![[Previous]](prev.gif) |
![[Contents]](contents.gif) |
![[Index]](keyword_index.gif) |
![[Next]](next.gif) |
Managing Source Code
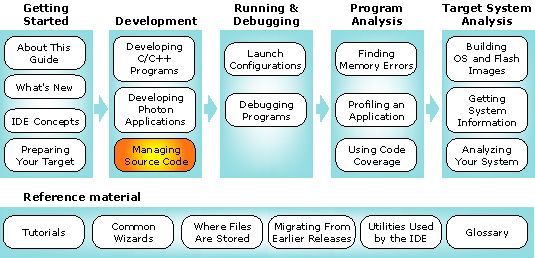
You can select a topic from this diagram:
This chapter describes managing source code from within the IDE.
In this chapter:
- CVS and the IDE
- Importing existing source code into the IDE
- Using container projects
- Importing a BSP or other QNX source packages
- Exporting projects
CVS and the IDE
CVS is the default source-management system in the IDE. Other systems (e.g. ClearCase) are also supported.
The CVS Repository Exploring perspective lets you bring code from CVS into your workspace. If another developer changes the source in CVS while you're working on it, the IDE helps you synchronize with CVS and resolve any conflicts. You can also choose to automatically notify the CVS server whenever you start working on a file. The CVS server then notifies other developers who work on that file as well. Finally, the CVS Repository Exploring perspective lets you check your modified code back into CVS.
 |
The IDE connects to CVS repositories that reside only on remote servers -- you can't have a local CVS repository (i.e. one that resides on your host computer) unless it's set up to allow CVS pserver, ext, or extssh connections. |
Local history feature
The IDE lets you "undo" changes with its local history. While you're working on your code, the IDE automatically keeps track of the changes you make to your file; it lets you roll back to an earlier version of a file that you saved but didn't commit to CVS.
For more information about the IDE's local history feature, see this link in the Workbench User Guide: .
Project files (.project and .cdtproject)
For each project, the IDE stores important information in these two files:
- .project
- .cdtproject
You must include both of these files with your project when you commit your changes into source control.
Core Eclipse documentation on using CVS in the IDE
Since the CVS Repository Exploring perspective is a core Eclipse feature, you'll find complete documentation in the Eclipse Workbench User Guide. Follow these links:
- Tips and Tricks, scroll down to the Team - CVS section
The following table may help you find information quickly in the Workbench User Guide:
| If you want to: | Go to: |
|---|---|
| Connect to a CVS repository | |
| Check code out of CVS | |
| Synchronize with a CVS repository | , particularly the Updating section |
| See who's also working on a file | |
| Resolve CVS conflicts | |
| Prevent certain files from being committed to CVS | |
| Create and apply a patch | |
| Track code changes that haven't been committed to CVS | , especially the Comparing resources with the local history section |
| View an online FAQ about the CVS Repository Exploring perspective |
Importing existing source code into the IDE
As with many tasks within the IDE, there's more than one method to bring existing source files into your workspace:
- filesystem drag-and-drop -- from a Windows host, you can drag-and-drop (or copy and paste) individual files from the filesystem into your project in your workspace.
- CVS repository -- you can use the CVS Repositories view to connect to a CVS repository and check out projects, folders, or files into your workspace.
- Import wizard -- this IDE wizard lets you import existing projects, files, as well as files from archives into your workspace.
- linked resources -- this lets you work with files and folders that reside in the filesystem outside your project's location in the workspace. You might use linked resources, for example, if you have a source tree that's handled by some other source-management tool outside of the IDE. For more information about linked resources, follow these links in the Workbench User Guide: .
Whatever method you use, you always need to set up an IDE project in your workspace in order to work with the resources you're importing.
If you're importing code that uses an existing build system, you may need to provide a Makefile with all: and clean: targets that call your existing build system.
For example, if you're using the jam tool to build your application, your IDE project Makefile might look like this:
all:
    jam -fbuild.jam

clean:
    jam -fbuild.jam clean
Projects within projects
If you have an existing source hierarchy that looks something like this:
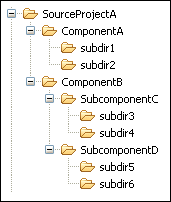
To work efficiently with this source in the IDE, each component and subcomponent should be a "subproject" within the one main project. (You could keep an entire hierarchy as a single project if you wish, but you'd probably find it cumbersome to build and work with such a monolith.)
Unfortunately, the current version of the IDE doesn't support nesting projects as such. So how would you import such a source tree? You would use the following four step process:
- Step 1: Creating an initial project for your source code
- Step 2: Creating a new project for each existing project or component in your source code tree
- Step 3: Linking the projects to a directory in the source tree
- Step 4: Building the component project in the linked folder
For information about container projects, see "Using container projects" in this chapter.
Step 1
First, in your workspace create a single project that reflects all the components that reside in your existing source tree:
- Select .
- Select the type of project (e.g. Standard Make C project).
- Name your project (e.g. EntireSourceProjectA).
- To tell the IDE where the resources reside in the filesystem (since they don't reside in your workspace), disable the Use Default Location option.
- In the Location field, type the path to your source (or click Browse...).
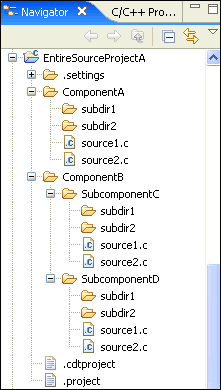
- Click Finish. You should now have a project
that looks something like this in the C/C++ Projects view:
Step 2
Now, you need to create an individual project (via ) for each of the existing projects (or components) in your source tree. In this example, you create a separate project for each of the following source components:
- ComponentA
- ComponentB
- SubcomponentC
- SubcomponentD
To create individual projects:
- Select .
- Select the type of project (e.g. Standard Make C project).
- In the Name type a descriptive name for your project (e.g. Project_ComponentA).
- Enable the Use default location option because you want the IDE to create a project in your workspace for this and all the other components that comprise your project EntireSourceProjectA. In the next step, you'll link each project to the actual location of the directories in your source tree.
- Click Finish, and you'll see Project_ComponentA in the C/C++ Projects view.
Step 3
Next, you'll link each individual project in the IDE to its corresponding directory in the source tree:
To link projects:
- Select .
- Make sure your new project (Project_ComponentA) is selected as the parent folder.
- Type a name for the folder (e.g. ComponentA).
- Click Advanced>>.
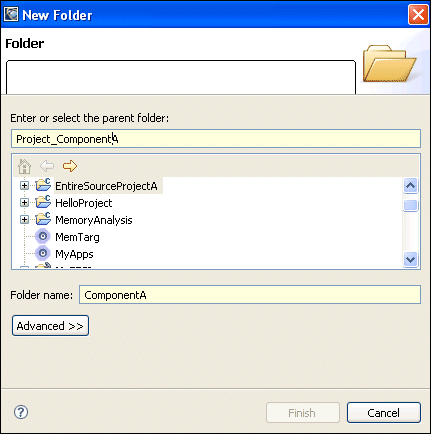
- Enable the Link to folder in the file system option.
- Type the path to that folder in your source tree (or use Browse... to locate and select one).
- Click Finish. Now. your Project_ComponentA project should show a folder called ComponentA; the contents of which actually reside in your source tree.
Step 4
Now, you need to tell the IDE to build Project_ComponentA in the ComponentA linked folder that you just created in your workspace:
- In the C/C++ Projects view, right-click Project_ComponentA, then select Properties from the context menu.
- Select C/C++ Make Project.
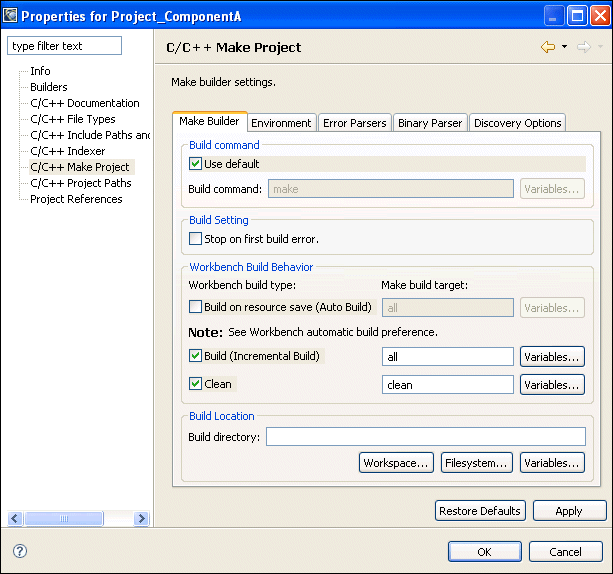
- In the Make Builder tab, set the Build Directory to ComponentA in your workspace.
Now, when you start to build Project_ComponentA, the IDE builds it in the ComponentA folder in your workspace (even though the source actually resides in a folder outside your workspace).
 |
Linked resources let you overlap
files in your workspace, so files from one project can
appear in another project. If you
change a file or other resource in one location, the
duplicate resource is also affected. For example, if you
delete a duplicate resource, its original is also
deleted.
Special rules apply when working with linked resources. Since a linked resource must reside directly below a project, you can't copy or move a linked resource into other folders. If you delete a linked resource from your project, this does not cause the corresponding resource in the filesystem to also be deleted. But if you delete child resources of linked folders, this does delete those child resources from the filesystem! |
Filesystem drag-and-drop
On Windows hosts, you can select files or folders and drop them into projects in the Navigator view:
- Create a new project. If your existing code has an existing build procedure, use a Standard Make C/C++ Project. If not, you can use a QNX C/C++ Project or a Standard Make C/C++ Project.
- Switch to the Navigator view.
- Select one or more source files or folders from Windows Explorer, then drag them into the project. The files are copied into your project workspace.
|
From Windows Explorer, you can also use Cut, Copy, and Paste to move or copy files into a project. |
CVS repository
Using the CVS Repository Exploring perspective, you can check out modules or directories into existing projects, or to create new projects.
Importing code into the IDE from CVS differs slightly depending on what you're importing:
- an existing C/C++ project
- existing C/C++ code that isn't part of a project
- existing C/C++ code that needs to be added to an existing project
Importing a C/C++ project from CVS
To check out an existing C/C++ project (either a QNX project or a Standard Make C/C++ project) from the CVS repository into your workspace:
- Right-click the project in the CVS Repositories view and
choose Check Out from the menu.
The IDE creates a project with the same name as the CVS module in your workspace. The project is automatically recognized as a Standard Make C/C++ or QNX C/C++ project (if the project has .project and .cdtproject files).
- If the project is a QNX project:
- Right-click the new project in the Navigator or C/C++ Projects view and choose Properties.
- Click the Build Variants tab, which displays a
warning:

- Select one or more of the build variants, then click OK.
Importing C/C++ code from CVS
To check out existing C/C++ code that isn't part of a project:
- Right-click the module or directory in the CVS
Repositories view and choose Check Out As...
from the menu.
The IDE displays the Check Out As wizard.
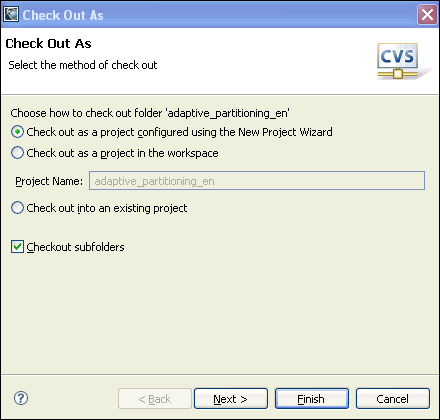
The Check Out As wizard.
- Choose how to check out this project:
- as a project configured using the New Project
wizard
or:
- as a new project in the workspace
or:
- as a Standard Make C/C++ Project - if you need to create your own Makefile to integrate with an existing build process
- as a project configured using the New Project
wizard
- Choose the workspace location for this project, then specify the CVS tag to check out. Click Finish to exit the Check Out As dialog.
- Click Next to continue.
- If you're creating or checking out a QNX project:
- Right-click the new project in the Navigator or C/C++ Projects view and choose Properties.
- Click the Build Variants tab, which displays a
warning:
- Select one or more of the build variants, then click OK.
- If you're creating a Standard Make C/C++ project, create a new Makefile with appropriate all: and clean: targets.
Importing C/C++ code into an existing project
To import a directory full of C/C++ code into an existing project:
- Right-click the module or directory in the CVS
Repositories view and choose Check Out As...
from the menu.
The IDE displays the Check Out As dialog.
- Choose Check out into an existing project, and then click
Next.
The IDE displays the Check Out Into dialog:
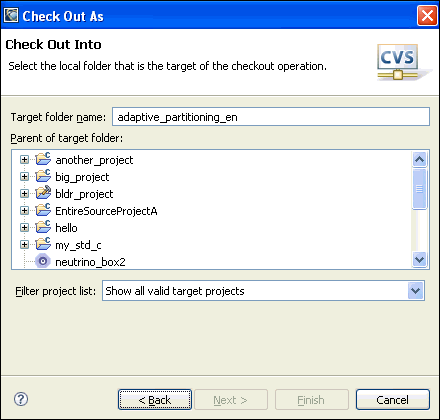
- Select an existing project from the list, and then click Finish to add the code from CVS to the selected project.
Import wizard
Use the Import wizard to bring files or folders into an existing project from a variety of different sources, such as:
- an existing container project
- an existing project
- another directory
- a QNX Board Support Package
- a QNX mkifs Buildfile
- a QNX Source Package
- a Team Project Set
- a Zip file
For details, see "Importing projects" in the Common Wizards Reference chapter.
Linked resources
As an alternative to dragging-and-dropping, you can link files and folders into a project. This method of linking resources lets you include files in your project, even if they need to reside in a specific place on your filesystem (because of a restrictive source control system, for example).
To add a linked resource to a project in the C/C++ Project or Navigator view:
- Right-click on a project, then select either or .
The New File or New Folder dialog appears.
- In the Name field, type a new name for the file or folder.
- Click Advanced >>, and enable either the Link to file in the file system or Link to folder in the file system option.
- Type the full path to the file or folder, or click Browse... to select a specific file or folder.
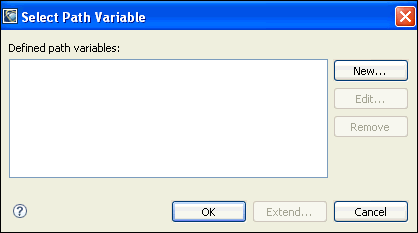
- Click Variables... to define any path variables
for use in the file or folder path:
- Click Finish to link the file or folder into your project.
See in the Workbench User Guide for more information about linked resources.
Using container projects
A container is a project that creates a logical grouping of subprojects. Containers can ease the building of large multiproject systems. You can have containers practically anywhere you want on the filesystem, with one exception: containers can't appear in the parent folders of other projects. The IDE doesn't support the creation of projects in projects.
Containers let you specify just about any number of build configurations (which are analogous to build variants in C/C++ projects). Each build configuration contains a list of subprojects and specifies which variant to build for each of those projects.
|
Each build configuration may contain a different list and combination of subprojects (e.g. QNX C/C++ projects, Standard Make C/C++ projects, or other container projects). |
Creating a container project
|
In order to create a container, you must have at least one subproject that you want to contain. |
To create a container project:
- Select , then .
- Click Next.
- Name the container.
- Click Next.
- In the New Project dialog, click Add Project....
- Now select all the projects (which could be other
containers) that you want to include in this container:
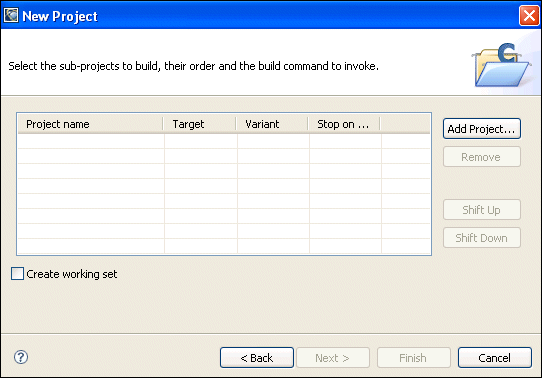
Each subproject has an entry for make targets under the Target field. You can click on an entry to get a menu that lets you change the selection. The "Default" entry means "don't pass any targets to the make command." QNX C/C++ projects interpret this as "rebuild." If a subproject is also a container project, this field represents the build configuration for that container.
You can set the default for QNX C/C++ projects by opening the Preferences dialog box ( in the menu), then choosing . - If the project is a QNX C/C++ project, you can click in its Variant entry to select the build variant for each project you wish to build. You can choose All (for every variant that has already been created in the project's folder) or All Enabled (for just the variants you've selected). Note that the concept of variants makes sense only for QNX C/C++ projects.
- If you wish, click in the Stop on error column to control whether the build process for the container stops at the first subproject to have an error or continues to build all the remaining subprojects.
- If you want to reduce clutter in the C/C++ Projects
view, then create a working set for your container.
The working set contains all the projects initially added to the container.
Note that the working set and the container have the same name.
If you later add elements to or remove elements from a container project, the working set isn't updated automatically. - Click Finish. The IDE creates your container project.
To select a working set, click the down-arrow at the top of the C/C++ Projects view pane, and then select the working set you want.
Setting up a build configuration
Just as QNX C/C++ projects have build variants, container projects have build configurations. Each configuration can be entirely distinct from other configurations in the same container. For example, you could have two separate configurations, say Development and Released, in your top-level container. The Development configuration would build the Development configuration of any subcontainers, as well as the appropriate build variant for any subprojects. The Released configuration would be identical, except that it would build the Released variants of subprojects.
|
Note that the default configuration is the first configuration that was created when the container project was created. |
To create a build configuration for a container:
- In the C/C++ Projects view, right-click the container.
- Select Create Container Configuration....
- In the Container Build Configuration dialog, name the configuration.
- Click Add Project, then select all the projects to be included in this configuration.
- Change the Variant and Stop on error entries for each included project, as
appropriate.
If you want to change the build order, use the Shift Up or Shift Down buttons. - Click OK.
Editing existing configurations
There are two ways to change existing configurations for a container project, both of which appear in the right-click menu:
- Properties
- Build Container Configuration
|
Although you can use either method to edit a configuration,
you might find changing the properties easier because it
shows you a tree view of your entire container
project.
Note also that you can edit only those configurations that are immediate children of the root container. |
Editing via project properties
You can use the container project's properties to:
- add new configurations
- add projects to existing configurations
- specify which variant of a subproject to build
To edit a configuration:
- Right-click the container project and select Properties.
- In the left pane, select Container Build Configurations.
- Expand the project in the tree view on the right.
- Select the configuration you want to edit. Configurations are listed as children of the container.
- Click the Edit button at the right of the dialog. This opens the familiar Container Build Configuration dialog (from the New Container wizard), which you used when you created the container.
- Make any necessary changes -- add, delete, reorder
projects, or change which make target or variant you want
built for any given project.
While editing a configuration, you can include or exclude a component from the build just by checking or unchecking the component. Note that if you exclude a component from being built, it's not removed from your container. - Click OK, then click OK again (to close the Properties dialog).
Editing via the Build Container Configuration... item
You can access the Container Build Configuration dialog from the container project's right-click menu.
Note that this method doesn't show you a tree view of your container.
To edit the configuration:
- Right-click the container project, then select Build Container Configuration....
- Select the configuration you want to edit from the list.
- Click the Edit button. This opens the familiar Container Build Configuration dialog (from the New Container wizard), which you used when you created the container.
- Make any necessary changes -- add, delete, reorder projects, or change which make target or variant you want built for any given project.
- Click OK to save your changes and close the dialog.
- Click Build or Cancel in the Build Container Configuration dialog.
Building a container project
Once you've finished setting up your container project and its configurations, it's very simple to build your container:
- In the C/C++ Projects view, right-click your container project.
- Select Build Container Configuration....
- Choose the appropriate configuration from the dialog.
- Click Build.
|
A project's build variant selected in the container
configuration is built, regardless of whether the
variant is selected in the C/C++ project's properties. In
other words, the container project overrides the individual
project's build-variant setting during the build.
The one exception to this is the All Enabled variant in the container configuration. If the container configuration is set to build all enabled variants of a project, then only those variants that you've selected in the project's build-variant properties are built. |
To build the default container configuration, you can also use the Build item in the right-click menu.
Importing a BSP or other QNX source packages
QNX BSPs and other source packages (e.g. DDKs) are distributed as .zip archives. The IDE lets you import these packages into the IDE:
| When you import a: | The IDE creates a: |
|---|---|
| QNX BSP source package | System Builder project |
| QNX C/C++ source package | C or C++ application or library project |
Step 1: Use
You import a QNX source archive using the standard Eclipse import dialog:
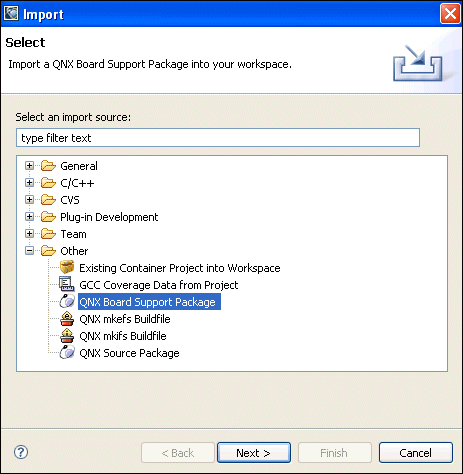
|
If you're importing a BSP, select QNX Board Support Package. If you're importing a DDK, select QNX Source Package. |
As you can see, you can choose to import either a QNX BSP or a "source package." Although a BSP is, in fact, a package that contains source code, the two types are structured differently and generate different types of projects. If you try to import a BSP archive as a QNX Source Package, the IDE won't create a System Builder project.
Step 2: Select the package
After you choose the type of package you're importing, the wizard presents you with a list of the packages found in $QNX_TARGET/usr/src/archives on your host:
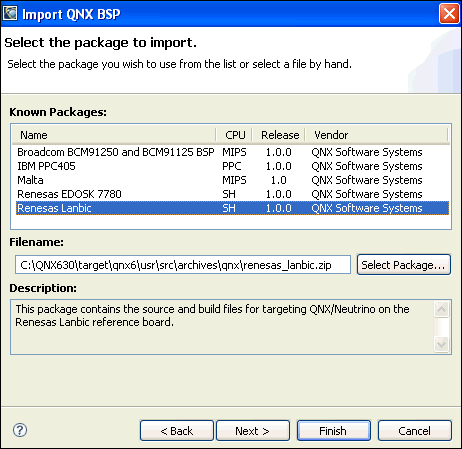
Notice that as you highlight a package in the list, a description for that package is displayed.
To add more packages to the list:
- Click the Select Package... button.
- Select the .zip source archive you want to add.
Step 3: Select the source projects
Each source package contains several components (or projects, in IDE terms). For the package you selected, the wizard gives you a list of each source project contained in the archive:
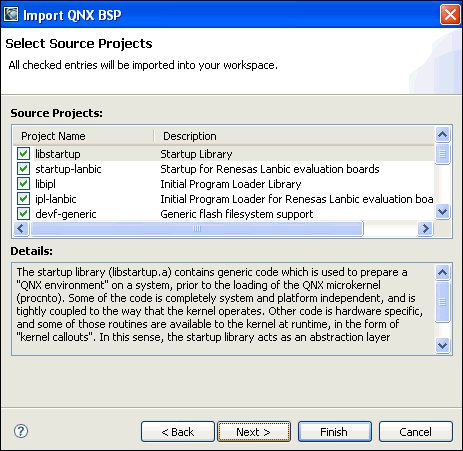
You can decide to import only certain parts of the source package; simply uncheck the entries you don't want (they're all selected by default). Again, as you highlight a component, you'll see its description in the bottom pane.
Step 4: Select a working set
The last page of the import wizard lets you name your source projects. You can specify:
- Working Set Name -- to group all related imported projects together as a set
- Project Name Prefix -- for BSPs, this becomes the name of the System Builder project; for other source projects, this prefix lets you import the same source several times without any conflicts.
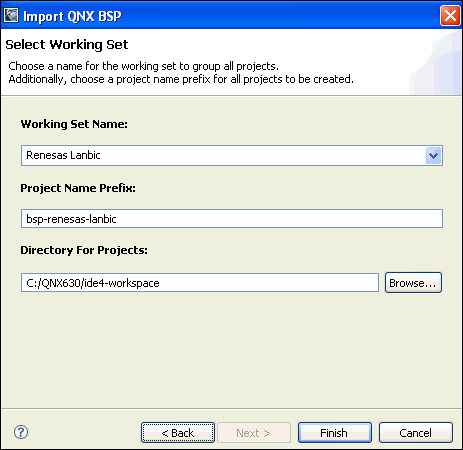
If you plan to import a source BSP and a binary BSP into the IDE, remember to give each project a different name.
|
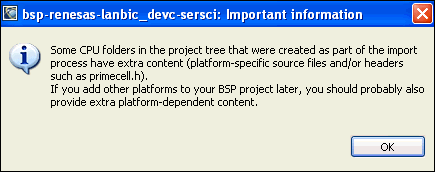
If you import dual-endian BSPs, the wizard displays this informational message:
If you add build variants, you need to copy the CPU-specific files to the new variant's build directories. |
Step 5: Build
When you finish with the wizard, it creates all the projects and brings in the source from the archive. The wizard then asks if you want to build all the projects you've just imported.
|
If you answer Yes, the IDE begins the build process, which may take several minutes (depending on how much source you've imported). |
If you decide not to build now, you can always do a Rebuild All from the main toolbar's Project menu at a later time.
If you didn't import all the components from a BSP package, you can bring in the rest of them by selecting the System Builder project and opening the import wizard (right-click the project, then select Import...). The IDE detects your selection and then extends the existing BSP (rather than making a new one).
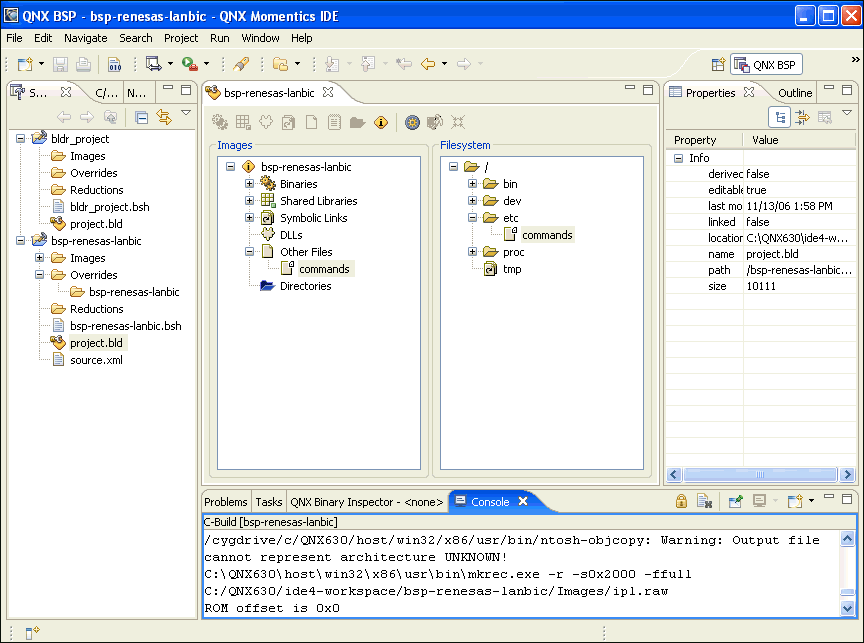
QNX BSP perspective
When you import a QNX Board Support Package, the IDE opens the QNX BSP perspective. This perspective combines the minimum elements from both the C/C++ Development perspective and the System Builder perspective:
Exporting projects
You can export projects to your filesystem or to an archive file by doing one of the following:
- Drag a file or folder from a project to your filesystem.
Press Alt while dragging to copy the file or folder instead of moving it out of the project. - Use the Copy (to copy) or Cut (to move) context-menu items, then Paste the file into your filesystem.
- Export to the filesystem using the Export... command.
- Export to an archive file using the Export... command.
Using the Export... command
The Export wizard helps you export an entire project to your filesystem or an archive file.
To export one or more projects:
- Choose (or
Export... from the Navigator context menu).
The Export wizard appears:
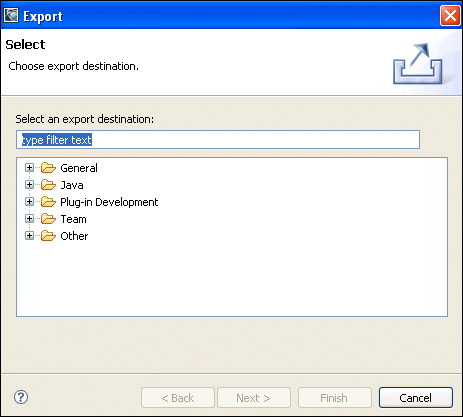
- To export your project to the filesystem, choose . To export your project to an archive
file, choose . Click Next.
The Export wizard's next panel appears:
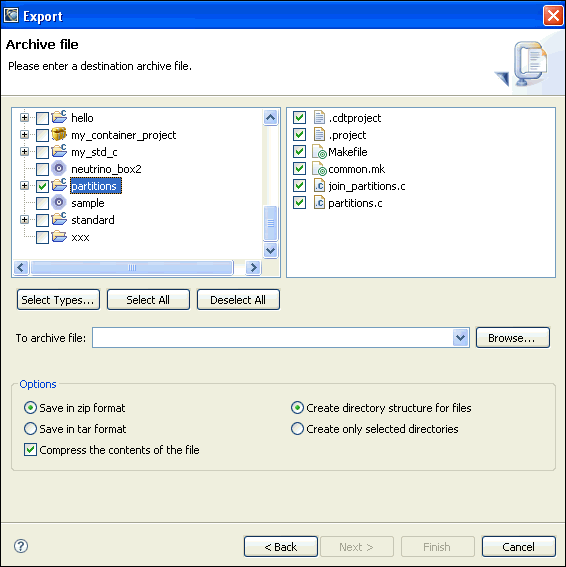
- Select the projects you want to export. You can also select or
deselect specific files in each project.
To select files based on their extensions, click the Select Types... button. The Select Types dialog box appears:
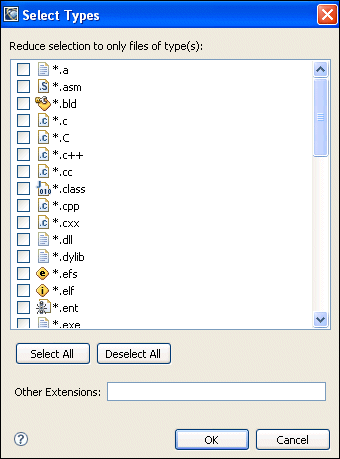
Click one or more extensions, then click OK to filter the selected files in the Export wizard.
- Type the name of the directory (if you're exporting to the filesystem) or file (if you're exporting to an archive file) in the input field.
- When you're done, click Finish.
|
If you export more than one project, and you import from the resulting filesystem or archive file, you'll get one project containing all of the projects you exported. |
|
|
|
|