Common Wizards Reference
![[Previous]](prev.gif) |
![[Contents]](contents.gif) |
![[Index]](keyword_index.gif) |
![[Next]](next.gif) |
Common Wizards Reference
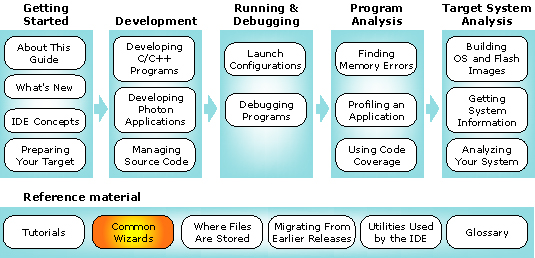
You can select a topic from this diagram:
This chapter describes the IDE's wizards.
In this chapter:
- Introduction
- Creating a C/C++ project
- Creating a target project
- Converting projects
- Importing projects
Introduction
Wizards guide you through a sequence of tasks, such as creating a new project or converting an existing non-QNX project to a QNX C/C++ application or library project.
Wizards aren't directly connected to any perspective. You can access all the project creation wizards from the main menu by selecting .
In the New Project dialog, the wizards are categorized according to the nature of the project. If you expand C, you'll see all projects that have a C nature; expand QNX, and you'll see all the projects with a QNX nature:
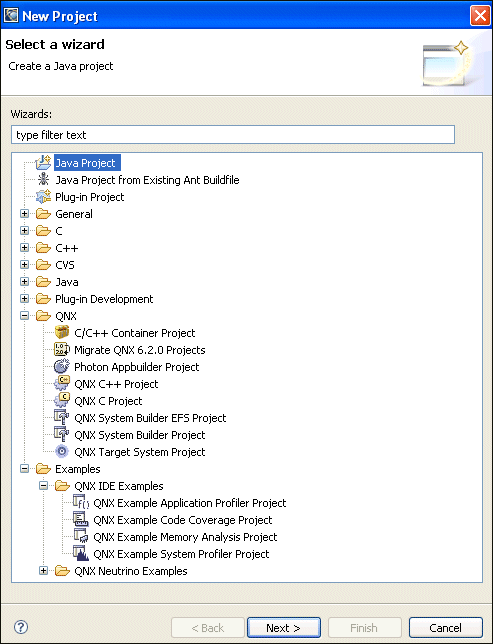
Notice the overlap: the QNX C Project wizard appears in both C and QNX.
 |
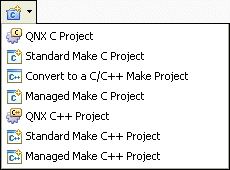
In the C/C++ Development perspective, you can also access
the QNX C/C++ Projects wizards via the New C/C++ Project button:
|
Besides the nature-specific wizards, the IDE also has "simple" wizards that deal with the very basic elements of projects: Project, Folder, and File. These elements have no natures associated with them. You can access these wizards by selecting .
|
Although a project may seem to be nothing other than a
directory in your workspace, the IDE attaches special
meaning to a project -- it won't automatically
recognize as a project any directory you happen to create in
your workspace.
Once you've created a project in the IDE, you can bring new folders and files into your project folder, even if they were created outside the IDE (e.g. using Windows Explorer). |
- To have the IDE recognize folders and files:
- In the Navigator view, right-click the navigator pane and select Refresh.
Creating a C/C++ project
You use the New Project wizard to create a C or C++ project, which can be one of these varieties:
- QNX C Project
QNX C++ Project - A C or C++ project for multiple target platforms. It supports the QNX-specific project structure using common.mk files to perform a QNX recursive make. A QNX Project can automatically build either one executable or one library object (in different formats). You can switch between application or library nature by using the project properties.
- Standard Make C Project
Standard Make C++ Project - A basic C or C++ project that uses a standard Makefile and GNU make to build the source files. You don't get the added functionality of the QNX build organization and the common.mk file, but these standard projects adapt well to your existing code that you wish to bring into the IDE. (For more about Makefiles and the make utility, see the Conventions for Makefiles and Directories chapter in the Neutrino Programmer's Guide.)
- Managed Make C Project
Managed Make C++ project - A managed make project generates the Makefile for you automatically. In addition, the module.dep and module.mk files are created for every project subdirectory. These files are required for your managed make projects to build successfully.
As a rule, the IDE provides UI elements to control most of the build properties of QNX projects, but not of Standard Make projects (unless you consider a Makefile a "UI element").
How to create a C/C++ project
To create a C/C++ project :
- From the menu, select .
- In the left pane, select the project's nature according
to this table:
If you want to build a: Select: Standard Make C Project C Managed Make C Project C QNX C Project C or QNX Standard Make C++ Project C++ Managed Make C++ Project C++ QNX C++ Project C++ or QNX - In the right pane, select the type of project that you want (e.g. QNX C Project).
- Click Next.
- Give your project a name.
Even though the wizard allows it, don't use any of the following characters in your project name: | ! $ ( " ) & ` : ; \ ' * ? [ ] # ~ = % < > { }
because they'll cause problems later.
- If you don't want to use the default location for the project, specify a different one.
- Select the type (application or one of library types):
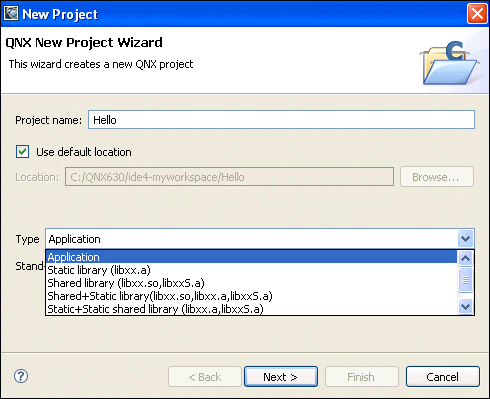
If you're building a library, see below.
- Click Next. The wizard displays the appropriate tabs.
- Select each tab and fill in the required information. The fields for each tab are described in the "Tabs in the New C/C++ Project wizard" section, below.
- Click Finish. The IDE creates your new project in your workspace.
If you're building a library project
You'll need to choose the type of library you wish to build:
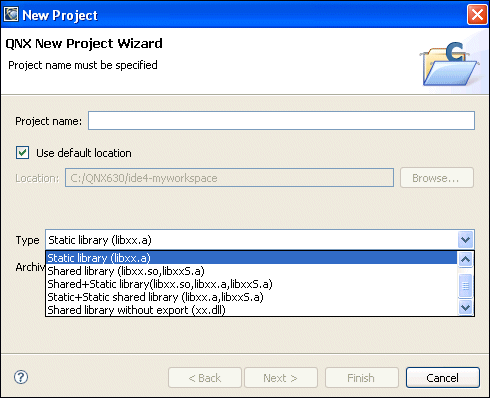
- Static library (libxx.a)
- Combine object files (i.e. *.o) into an archive (*.a) that is directly linked into an executable.
- Shared library (libxx.so)
- Combine object files together and join them so they're relocatable and can be shared by many processes. Shared libraries are named using the format libxx.so.version, where version is a number with a default of 1. The libxx.so file usually is a symbolic link to the latest version.
- Static library for shared objects (libxxS.a)
- Same as a static library, but using position-independent code (PIC). Use this if you want a library that is linked into a shared object. The System Builder uses these types of libraries to create new shared libraries that contain only the symbols that are absolutely required by a specific set of programs.
- Shared library without export (xx.dll)
- A shared library without versioning. Generally, you manually open the library with the dlopen() function and look up specific functions with the dlsym() function.
If you're building a Standard Make C/C++ project
Since this type of project doesn't use the QNX recursive multivariant Makefile structure, you'll have to set up your own Makefile.
Here's how to create a simple "Hello World" non-QNX project:
- Open the New Project wizard.
- Select Standard Make C (or C++) Project, then click Next.
- Name your project, then click Finish. The IDE has now
created a project structure.
Even though the wizard allows it, don't use any of the following characters in your project name (they'll cause problems later): | ! $ ( " ) & ` : ; \ ' * ? [ ] # ~ = % < > { } - Now you'll create a makefile for your project. In the
Navigator view, highlight your project, then click the Create a
File button on the toolbar:

- Name your file "Makefile" and
click Finish. The editor should now open, ready for you to
create your Makefile.
Here's a sample Makefile you can use:
CC:=qcc

hello: hello.c

all: hello

clean:
    rm -f hello.o hello
Use Tab characters to indent commands inside of make rules, not spaces. - When you're finished editing, save your file (right-click, then select Save, or click the Save button in the tool bar).
- Finally, you'll create your "hello world" C
(or C++) source file. Again, open a new file, which might
look something like this when you're done:
#include <stdlib.h>
#include <stdio.h>

int main(int argc, char *argv[]) {
    printf("Hello, world!\n");
    return EXIT_SUCCESS;
}
Tabs in the New C/C++ Project wizard
Depending on the type of project you choose, the New Project wizard displays different tabs:
- QNX C or C++ Project
- Tabs:
- Options
- Build Variants
- Make Builder
- Error Parsers
- Projects
- Standard or Managed Make C or C++ project
- Tabs:
- Projects
- Make Builder
- Environment
- Error Parsers
- Binary Parser
- Discovery Options
- C/C++ Indexer
Build Variants tab
The Build Variants tab lets you choose the platforms to compile executables for:

|
By default, none of the platforms are enabled. You might want to change your default preferences for all new QNX projects. To do this, open . |
Select the specific architecture(s) and build variant(s) you want to build your project for.
You can click the Select All button to enable all of the listed variants, or the Deselect All button to disable all of the listed variants.
You can click the Add button to add a new variant under the currently selected target architecture, or the Delete button to remove the currently selected variant.
You must choose one build variant for the Indexer to use:
- Select the build variant you want the Indexer to use.
- Click the Set Indexer Variant button.
The variant's name changes to include "> This variant's symbols and include paths will be used for source indexing."
Projects tab
In the Referenced Projects list, you can set project dependencies for the new project. In the list of other projects in the Workbench, you can select one or more projects you want the new project to depend on. Initially, no projects will be selected.
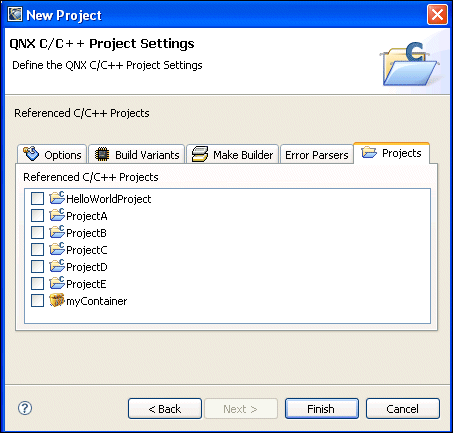
For example, if you associate myProject with mySubProject, the IDE builds mySubProject first, followed by your project. If you change mySubProject, the IDE doesn't automatically rebuild myProject.
Make Builder tab
The Make Builder tab lets you configure how the IDE handles make errors, what command to use to build your project, and when to do a build:

- Build Setting
- If you want the IDE to stop building when it encounters a make or compile error, check Stop on first build error..
- Build Command
- If you want the IDE to use the default make command, check Use Default. If you want to use a different utility, uncheck Use Default and enter your own command in the Build Command field (e.g. C:/myCustomMakeProgram).
- Workbench Build Behavior
- You can specify how you want the IDE to build your
project. For example, you can:
- check Build on resource save (Auto Build) to enable automatic building
- change the name of the auto build target (the default is all)
- change the name of the incremental build target (the default is all)
- change the name of the clean target (the default is clean)
Error Parsers
The Error Parsers tab lets you specify which build output parsers (e.g. Intel C/C++ Compiler Error Parser, CDT GNU Assembler Error Parser, etc.) apply to this project and in which order. To change the order, simply select an item, then use the Up or Down buttons to position the item where you want in the list.

Options tab
The Options tab lets you specify several attributes for the project you're building:

- General options
- By default, some project properties (e.g. active targets) are local -- they're stored in the .metadata folder in your own workspace. If you want other developers to share all of your project's properties, then set Share all project properties on. The IDE then stores the properties in a .cdtproject file, which you can save in your version control system so that others may share the project file.
- Build Options
- If you want to profile your application and take full
advantage of the QNX Application Profiler, then check
Build with Profiling (see the Profiling an Application
chapter in this guide).
If you want use the QNX Code Coverage tool, then check Build with Code Coverage (see the Using Code Coverage chapter in this guide).
If you want the IDE to do more dependency checking than it normally would, then set the Enhanced dependency checking option on. Note that this means slower builds, so you may want to turn this off in order to improve build times.
Binary Parser tab
If you're building a Standard Make C/C++ project, then this tab lets you define which binary parser (e.g. ELF Parser) to use to deal with the project's binary objects.

For more information about indexers, see the "Choosing an indexer" chapter.
Discovery Options tab
If you're building a Standard Make C/C++ project, then this tab lets you control how include paths and C/C++ macro definitions for this particular project are automatically discovered. Certain features of the IDE (e.g. syntax highlighting, code assistance, etc.) rely on this information, as do source-code parsers.

|
At a later time, you can supply this data using the Search Paths item in the project properties. |
C/C++ Indexer tab
If you're building a Standard Make C/C++ project, then this tab lets you control the C/C++ source code indexer. Certain features of the IDE rely on this information.

Environment tab
If you're building a Standard Make C/C++ project, then this tab lets you control environment variables used by the build.

Creating a target
You must create a Target System Project for every target you want to use with the IDE.
To create a new target:
- From the main menu, select .
- Expand QNX category.
- Select QNX Target System Project.
- Click Next. The New QNX Target System Project wizard appears:
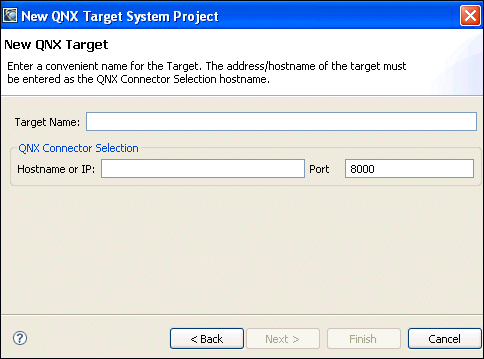
- Complete the fields described below:
- Target Name
- Type a descriptive name for your QNX Target System Project.
- Hostname or IP
- Enter the hostname or IP address for the target system that's running qconn.
- Port
- Enter the port number for qconn. Leave this as the default (8000), if you're running qconn with the default settings.
- Click Finish. Your new QNX Target System
Project appears in the Navigator view. When you create a
launch configuration, the target is listed under the Main
tab in the Target Options pane. Note that you can use the
Add New Target button in the Target Options pane to
open the New Target System Project wizard.
You can also reach the New Target System Project wizard from within the Target Navigator view (right-click, then select Add New Target).
Converting projects
At various times, you may need to convert non-QNX projects to QNX projects (i.e. give them a QNX nature). For example, suppose another developer committed a project to CVS without the .project and .cdtproject files. The IDE won't recognize that project as a QNX project when you check it out from CVS, so you'd have to convert it. Or, you may wish to turn a Standard Make C/C++ project into a QNX C/C++ project in order to take advantage of the QNX recursive Makefile hierarchy (a project with a QNX nature causes the IDE to use the QNX make tools and structure when building that project).
The IDE lets you convert many projects at once, provided you're converting all those projects into projects of the same type.
|
If you wish to convert a QNX project back into a Standard Make C/C++ project, you can use the Convert C/C++ Projects wizard. From the main menu, select . Expand C, then select Convert to a C or C++ Project. |
Converting to a QNX project
To convert a non-QNX project into a QNX project:
- From the menu, select .
- Expand QNX.
- Select Convert to a QNX Project.
- Click Next. The Convert C/C++ Projects wizard appears.

- Select the project(s) you want to convert in the Candidates for conversion field.
- Specify the language (C or C++).
- Specify the type of project (application or library).
- Click Finish. Your converted project appears in the C/C++ Projects view and the Navigator view.
|
You now have a project with a QNX nature, but you'll need to make further adjustments (e.g. specify a target platform) via the Properties dialog if you want it to be a working QNX project. |
Completing the conversion
The conversion wizard gave your Standard Make project a QNX nature; you now need to use the Properties dialog to fully convert your project to a working QNX project.
To open the Properties dialog for a project:
- In the C/C++ Projects or Navigator view, right-click your project.
- Select Properties from the context menu. The
Properties dialog appears:
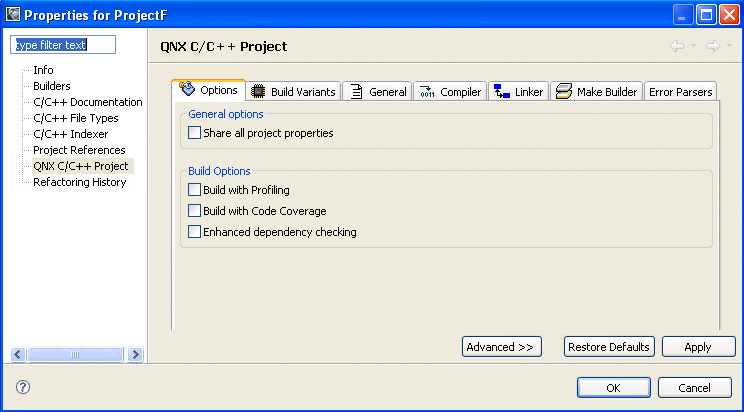
- In the left pane, select QNX C/C++ Project.
- Specify the properties you want using the available tabs:
- Options
- See the section "Tabs in the New C/C++ Project wizard," above.
- Build Variants
- See the section "Tabs in the New C/C++ Project wizard," above.
- General
- In the Installation directory field, you can
specify the destination directory (e.g. bin)
for the output binary you're building. (For more
information, see the Conventions for Makefiles and Directories chapter in the
Neutrino Programmer's Guide.)
In the Target base name field, you can specify your binary's base name, i.e. the name without any prefixes or suffixes. By default, the IDE uses your project name as the executable's base name. For example, if your project is called "Test_1," then a debug version of your executable would be called "Test_1_g" by default.
In the Use file name, enter the name of the file containing the usage message for your executable. (For more on usage messages, see the entry for usemsg in the Utilities Reference.
- Compiler
- See the section "Compiler tab," below.
- Linker
- See the section "Linker tab," below.
- Make Builder
- See the section "Tabs in the New C/C++ Project wizard," above.
- Error Parsers
- See the section "Tabs in the New C/C++ Project wizard," above.
- When you've finished specifying the options you want, click Apply, then OK. The conversion process is complete.
Compiler tab
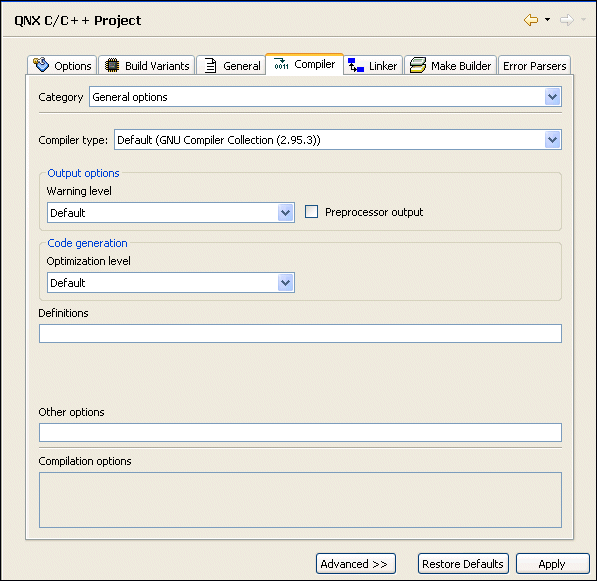
The Compiler tab changes depending on which of these categories you select:
- General options
- Extra source paths
- Extra include paths
- Compiler type
- If you've selected General options, the first
item you specify is the type of compiler. Currently, the
choices are:
- GCC 2.95.3
- GCC 3.3.5
- Intel (icc), if you've installed the Intel ICC for QNX Neutrino product
- Output options
- Here you can specify the warning level (0 to 9), i.e. the threshold level of warning messages that the compiler outputs. You can also choose to have the preprocessor output intermediate code to a file; the IDE names the output file your_source_file.i (C) or your_source_file.ii (C++), using the name of your source file as the base name.
- Code generation
- For the Optimization level, you can specify four levels: from 0 (no optimization) to 3 (most optimization). In the Stack size field, you can specify the stack size, in bytes or kilobytes.
- Definitions field
- Here you can specify the list of compiler defines to pass to the compiler on the command line in the form -D name[=value], but you don't have to bother with the -D part; the IDE adds it automatically.
- Other options field
- Here you can specify any other command-line options that aren't already covered in the Compiler tab. For more information on the compiler's command-line options, see qcc in the Utilities Reference.
- Extra source paths
- If you want to specify source locations other than your
project's root directory, select this category. Then click
the appropriate button to specify the location:
- Project... -- You can add source from another project in your current workspace. Note that the IDE uses relocatable notation, so even if other team members have different workspace locations, they can all work successfully without having to make any additional project adjustments.
- QNX target... -- You can add source from anywhere in or below the ${QNX_TARGET} directory on your host.
- Disk... -- You can choose to add source from anywhere in your host's filesystem.
- Extra include paths
- You can specify a list of directories where the compiler should look for include files. The options here are the same as for Extra source paths, except that here you can change the order of directories in the list, which can be important if you happen to have more than one header file with the same name.
Linker tab
The Linker tab changes depending on which of these categories you select:
- General options
- Extra library paths
- Extra libraries
- Extra object files
- Post-build actions
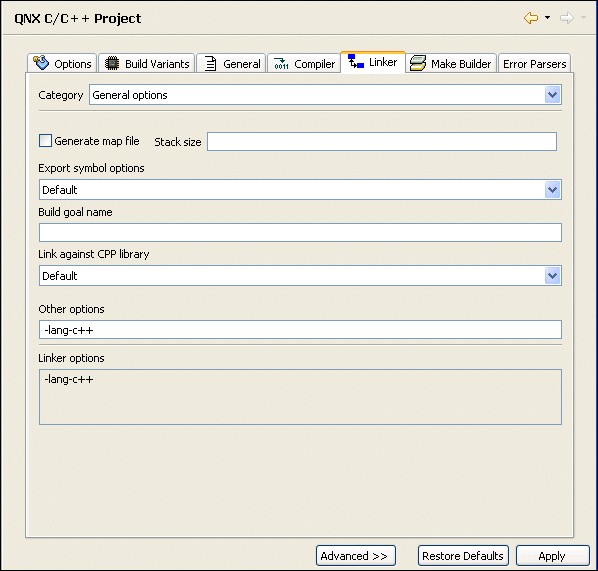
- Export symbol options
- This field lets you define the level of final stripping of your binary, ranging from exporting all symbols to removing just the debugger symbols to removing them all.
- Generate map file
- If you set this option on, the IDE prints a link map to the build console.
- Build goal name
- Specify the output filename for an application or
library project. Note that the name you enter in this field
forces the library's shared-object name to match.
By default, a generated application has the same name as the project it's built from. A library has prefix of "lib" and a suffix of ".a" or ".so" after the project name. In addition, debug variants of applications and libraries have a suffix of "_g".
- Link against CPP library (valid for C++ projects only)
- Select the particular C++ library you want to use.
QNX Momentics currently ships with these C++ libraries:
- Default -- The standard QNX C++ library, with support for all standard C++ features (exceptions, STL, etc.).
- Dinkum with exceptions and Dinkum without exceptions -- The Dinkum C++ library, with support for exceptions or without.
- Dinkum Abridged with exceptions and Dinkum Abridged without exceptions -- The Dinkum Abridged C++ library, with support for exceptions or without.
- Dinkum Embedded with exceptions and Dinkum Embedded without exceptions -- The Dinkum Embedded C++ library, with support for exceptions or without.
- GNU with exceptions -- The GNU G++ Standard Library, with support for exceptions.
Compiling C++ code without support for exceptions usually results in a faster executable.
- Library shared object name
- You can use this field to override the shared-object
name used in C/C++ library projects. Note that this doesn't
affect the actual filename.
If you specify a filename in the Build goal name field, don't use the Library shared object name field. - Library version
- This dropdown list lets you select a version number for
both the library's shared-object name and filename. If this
is a library that doesn't have a version number (e.g.
"platform.so"), then select
"No."
Note that you can still set the library version even if Build goal name is specified.
- Other options field
- Here you can specify any other command-line options that aren't already covered in the Linker tab. For more information on the linker's options, see the entry for ld in the Utilities Reference.
- Extra library paths
- Select this category if you want to specify locations where the linker should look for import libraries (.so or .a files). Then click the appropriate button to specify the location. (These buttons work in the same way as those in the Compiler tab when you select Extra source paths.)
- Extra libraries
- Here you can add a list of libraries (.so
or .a files) to search for unsatisfied
references. For each item in this list, you can define:
- the stripped name, the base name without the lib prefix (which ld adds automatically), and without the suffix (.so or .a).
- the library type (static or dynamic)
- debug or release mode. A "No" or "Yes" in this field indicates whether or not the builder matches the debug or release version of the library with the final binary's type. For example, if you select "Yes" and you want to link against a debug version of the library, the IDE appends "_g" to the library's base name. If you select "No," then the builder passes (to ld) this name exactly as you entered it. So, if you want to use a release version of your binary and link against a debug version of the library, specify MyLibraryName_g as the name.
Adding a new element to the extra library list automatically adds the directory where this library resides to the Extra library paths list (see above), if it's not already there. But if you remove an item from the list, its parent directory is not automatically removed. You can add a library in two ways:
- Add button -- lets you create an empty element and define it manually
- Add from project -- lets you browse your workspace for the library. Note that when you add a library from your workspace, the IDE uses a relocatable notation so other members with different workspace locations can all work successfully without having to make any project adjustments.
- Extra object files
- This lets you link a project against any object file or
library, regardless of the filename.
The file-selection dialog may seem slow when adding new files. This is because the system can't make assumptions about naming conventions and instead must use a binary parser to determine if a file is an object file or a library. Note also that the Extra object files option is available for an individual platform only. If a project has more than one active platform, you can't use this feature. In that case, you can still specify extra object files using the Advanced mode for each platform separately.
- Post-build actions
- When you select this category and click the Add
button, you'll see a dialog that lets you select one of four
predefined post-build actions for your project:
- Copy result to other location
- Move result to other location
- Rename result
- Run other shell command
In the What field, you specify the item (e.g. application) you want to copy or move; in the Where field, you specify the destination. You can use the To Workspace or To Filesystem buttons to locate the place.
If you select Rename result, a New Name field appears for you to enter the name. If you select Other command, enter the shell command in the field.
Note that you can set up more than one post-build action; they're processed sequentially.
Advanced/regular modes
The Properties dialog can appear in two different modes: regular (default) and advanced.
To activate the advanced mode, press the Advanced button at the bottom of the dialog.
To return to regular mode, press the Regular button.
In advanced mode, you can override various options that were set at the project level for the particular build variant you've selected:
- platform (the one specified or all supported platforms)
- build mode (e.g. debug, release, user-defined)
- compiler options
- linker options
For example, you can change the optimization level for a particular C file, specify which set of import libraries to use for a specific architecture, and so on.
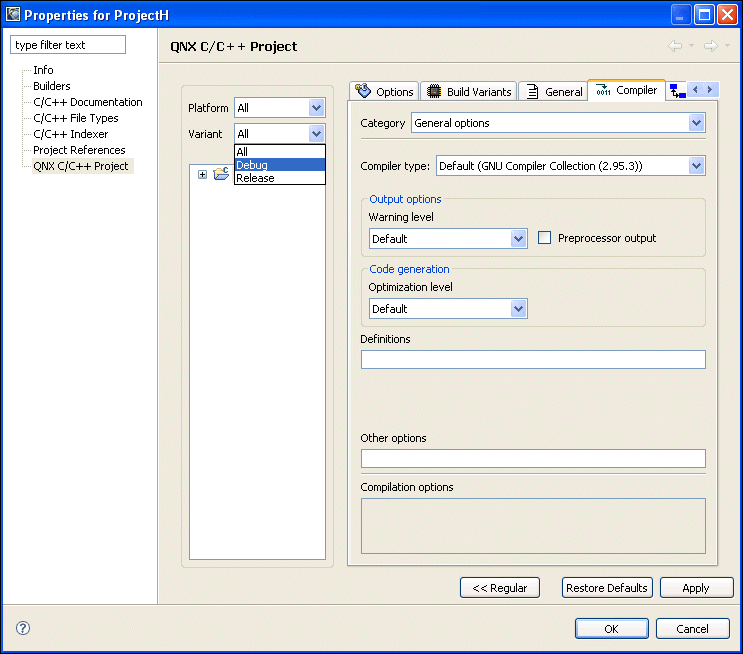
During the final build, the IDE merges the options you've set for the project's general configuration with the advanced options, giving priority to the advanced settings.
Importing projects
Use the Import wizard to bring resources into your workspace from a filesystem, ZIP archive, or CVS repository.
- To open the Import wizard:
- Choose , or right-click in the Navigator or C/C++ Projects view, and then choose Import....
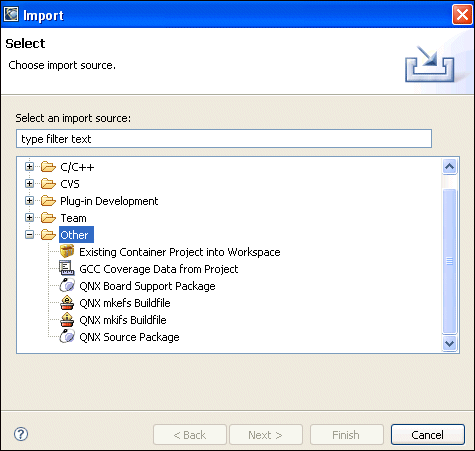
The Import wizard.
The Import wizard can import resources from several different sources:
- Existing Container Project into a Workspace
- Existing Project into a Workspace
- External Features
- External Plug-ins and Fragments
- File System
- GCC Coverage Data from a Project
- QNX Board Support Package
- QNX mkifs Buildfile
- QNX Source Package
- Team Project Set
- Archive file
Importing an existing container project into a workspace
To import a container project and its associated C/C++ projects from another workspace:
- In the Import wizard, choose Existing Container
Project into Workspace and click the Next button.
The IDE displays the Import Container Project From File System panel.
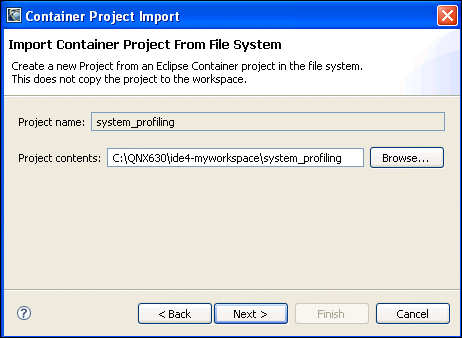
Importing a container project.
- Enter the full path to an existing container project directory in
the Project contents field, or click the
Browse... button to select a container project
directory using the file selector.
Click Next to continue. The IDE displays the Select components to install panel.
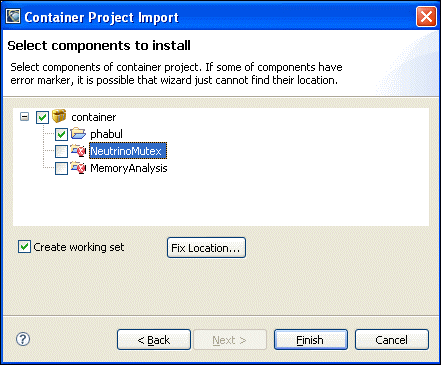
Selecting container components to import.
- By default, every project referenced by the container project is
also imported. To exclude certain projects, expand the project
tree and deselect projects you don't want to import.
Click Finish to import the container project and its subprojects.
Importing an existing project into a workspace
To copy an existing project from another workspace:
- In the Import wizard, choose Existing Project into
Workspace and click the Next button.
The IDE displays the Import Projects panel.
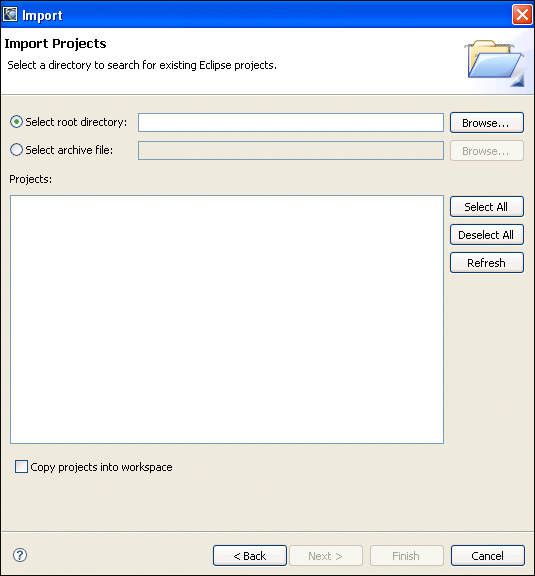
Importing an existing project.
- Enter the full path of an existing project directory in the Select root directory field, or the path to an archive in the Select archive file field, or click the appropriate Browse... button to select a project directory or archive using the file selector.
- Check the projects you want to import.
- If you wish, click Copy projects into workspace to leave the original project unchanged.
- Click the Finish button to import the selected project into your workspace.
Importing external features
Eclipse developers use this for developing IDE plugins and features.
Importing external plugins and fragments
Eclipse developers use this for developing IDE plugins and features.
Importing a file system
To copy files and folders from your filesystem into an existing project in your workspace:
- In the Import wizard, choose File System and
click the Next button.
The IDE displays the File system panel.
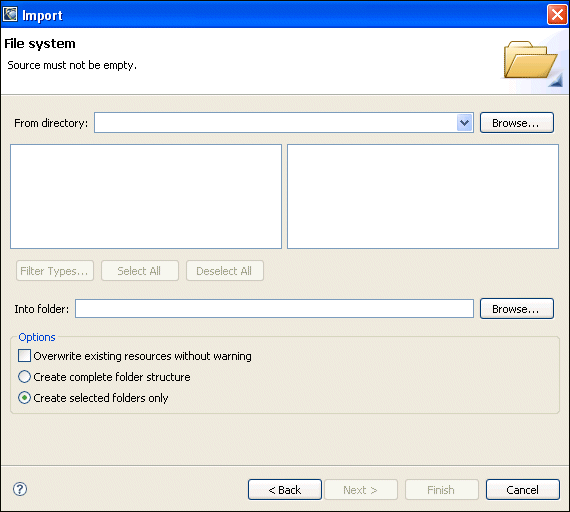
Importing code from the filesystem.
- Enter the full path to the code in the From directory field, or click the Browse... button to select a source directory.
- Use the Filter Types..., Select All, and
Deselect All buttons to control which files are
imported.
Click a directory on the left panel to see a list of files in the right panel.
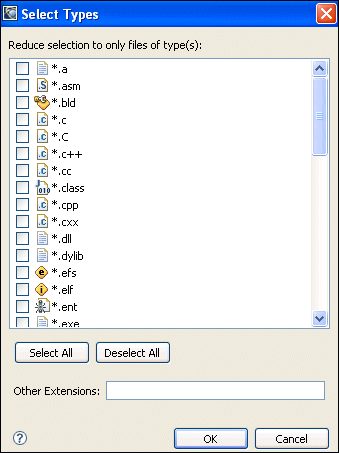
The Select Types dialog lets you filter imported files by selecting one or more extensions.
- Enter the name of a project or folder in the Into folder
field, or click the Browse... button to select one.
This project or folder must already exist before you bring up the Import wizard.
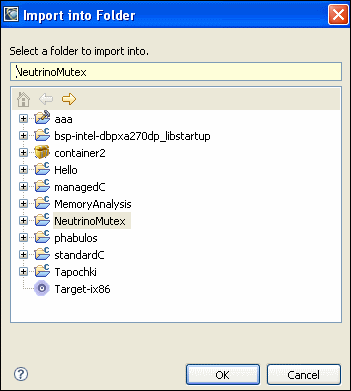
Browsing for a project or folder.
- To overwrite existing files, check the Overwrite existing resources without warning box.
- To import only the selected folders, check Create selected
folders only.
To import the selected folder and all sub folders, check Create complete folder structure.
- Click Finish to import the selected resources.
Importing resources.
Importing GCC coverage data from a project
The GCC Coverage Data from Project option in the Import wizard lets you import code coverage data from applications that have been run outside of the IDE.
For example, in a self-hosted build environment, if you run a code-coverage-enabled program from the command-line, it writes code-coverage data into a programname.da file in the same directory as the program's code.
To import code-coverage data:
- In the Import wizard, choose GCC Coverage Data from
Project, and then click the Next button.
The IDE displays the GCC Coverage Import panel.
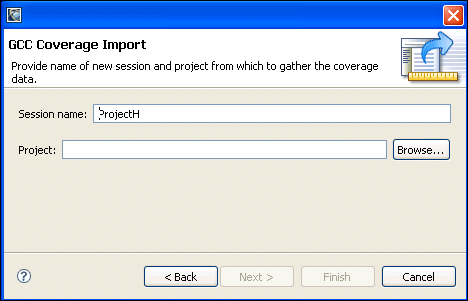
Importing GCC coverage data.
- Enter a code-coverage session name in the Session name field.
- Enter a project name in the Project field, or click the Browse... button to select a project.
- Click Next to continue.
The IDE displays the next panel.
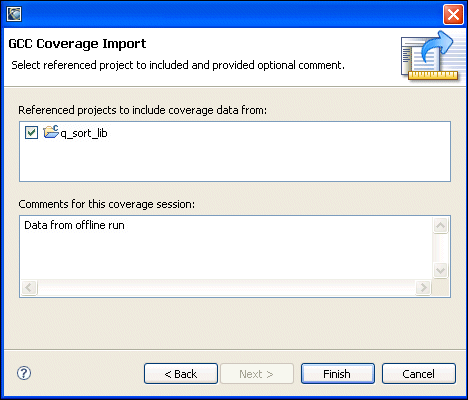
Referenced projects and comments.
- To include code-coverage data from referenced projects, select them in the Referenced projects to include coverage data from list.
- To include any comments with the new code-coverage session (such as details about the data you're importing), enter them in the Comments for this coverage session field.
- Click Finish to import the code coverage data as a new session in the Code Coverage Sessions view.
Importing a QNX Board Support Package
To copy a Board Support Package (BSP) into your workspace:
- In the Import wizard, choose QNX Board Support
Package and click the Next button.
The IDE displays the Import QNX BSP panel.
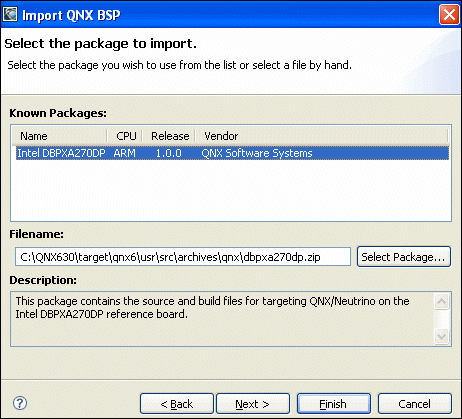
Importing a BSP.
- Select an installed BSP from the Known Packages list.
You can also enter the full path to a BSP archive (.zip file) in the Filename field, or click the Select Package... button to browse to a BSP archive.
Click Next to continue.
The IDE displays the Select Source Projects panel.
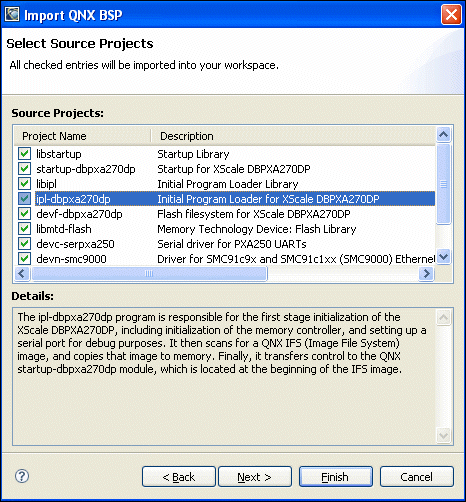
Selecting source projects from a BSP archive.
- All of the projects in the BSP archive are imported by default.
Uncheck any projects you don't need to import. Click
Next to continue.
The IDE displays the Select Working Set panel.
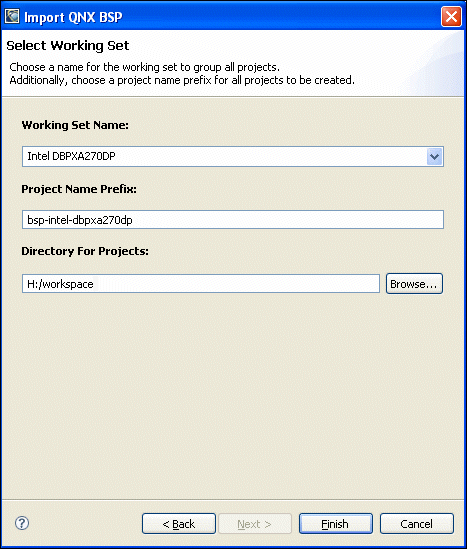
Selecting a working set from a BSP archive.
- To change the working-set name for the imported projects, enter a
new working-set name in the Working Set Name field, or
select one from the drop-down list.
To change the project name's prefix, enter a new prefix in the Project Name Prefix field. This is prepended to the name of each project imported from the BSP archive.
To change the destination directory for the projects, enter a new path in the Directory for Projects field, or click the Browse... button to select one. The default is your IDE workspace.
Click Finish to import the BSP projects.
The IDE imports the selected projects from the BSP archive and displays the Build Projects dialog.
- Click Yes to build all of the BSP projects that were just imported. Click No to return to the IDE.
Importing a QNX mkifs Buildfile
The IDE can import the .build files used by mkifs into an existing System Builder project.
To import a mkifs .build file:
- In the Import wizard, choose QNX mkifs Buildfile
and click the Next button.
The IDE displays the Import mkifs Buildfile panel.
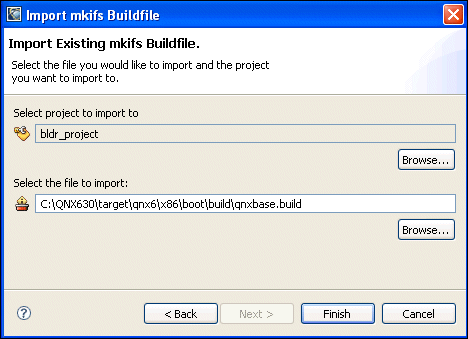
Importing a mkifs .build file.
- Click the Browse... button beside Select project to import to select a destination for this import.
- Enter the full path to a mkifs .build file in the Select the file to import field, or click the Browse... button to select one.
- Select one or more projects, and then click OK.
The IDE imports the selected .build file's System Builder configuration.
Importing a QNX source package
To copy a QNX source package into your workspace:
- In the Import wizard, choose QNX Source
Package and click the Next button.
The IDE displays the Import QNX Source Package panel.
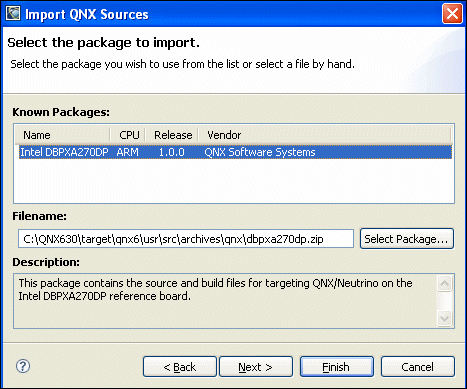
Importing a QNX Source Package.
- Select an installed source package from the Known
Packages list.
You can also enter the full path to a source package (.zip file) in the Filename field, or click the Select Package... button to browse to a source package.
Click Next to continue.
The IDE displays the Select Source Projects panel.
- All of the projects in the source package are imported by default.
Uncheck any projects you don't need to import. Click
Next to continue.
The IDE displays the Select Working Set panel.
- To change the working-set name for the imported projects, enter a
new working-set name in the Working Set Name field, or
select one from the drop-down list.
To change the project name prefix, enter a new prefix in the Project Name Prefix field. This is prepended to the name of each project imported from the source package.
To change the destination directory for the projects, enter a new path in the Directory for Projects field, or click the Browse... button to select one. The default is your IDE workspace.
Click Finish to import the projects.
The IDE imports the selected projects from the source package and displays the Build Projects dialog.
- Click Yes to build all of the projects that were just imported. Click No to return to the IDE.
Importing a team project set
Team project sets are a convenient way of distributing a collection of projects stored in a CVS server among members of your development team. Create them with the Export wizard.
To import a team project set and the projects it references:
- In the Import wizard, choose Team Project Set
and click the Next button.
The IDE displays the Import a Team Project Set panel.
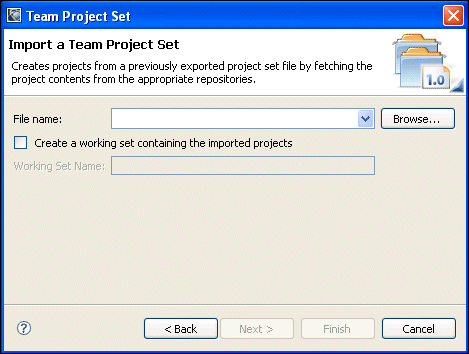
Importing a Team Project Set.
- To create a working set for the imported projects, check the
Create a working set containing the imported projects
box, and enter a name for the working set in the Working Set
Name field.
Click Finish to import the projects from the CVS repository.
Importing an archive file
To copy files and folders from a ZIP archive into an existing project in your workspace:
- In the Import wizard, choose Archive File and
click the Next button.
The IDE displays the Archive File panel.
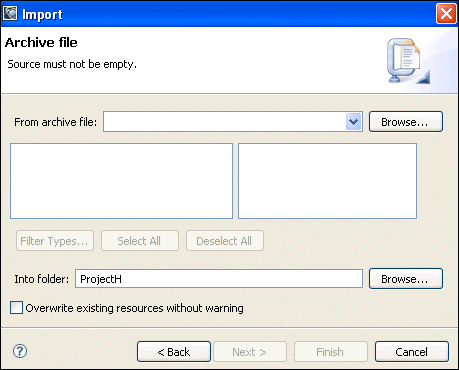
Importing code from a ZIP archive.
- Enter the full path to the ZIP archive in the From zip file field, or click the Browse... button to select a ZIP archive.
- Use the Filter Types..., Select All, and
Deselect All buttons to control which files are
imported.
Click a directory on the left panel to see a list of files in the right panel.
The Select Types dialog lets you filter imported files by selecting one or more extensions.
- Enter the name of a project or folder in the Into folder
field, or click the Browse... button to select one.
This project or folder must already exist before you open the Import wizard. - To overwrite existing files, check the Overwrite existing resources without warning box.
- To import only the selected folders, check Create selected
folders only.
To import the selected folder and all subfolders, check Create complete folder structure.
- Click Finish to import the selected resources.
|
|
|
|