About the Input DDK
![[Previous]](prev.gif) |
![[Contents]](contents.gif) |
![[Index]](keyword_index.gif) |
![[Next]](next.gif) |
About the Input DDK
This chapter includes:
What you'll find in this guide
In this preface, you'll find Building DDKs. This document provides information about changes to installing DDKs.
The following table may help you find information quickly:
| If you want to: | Go to: |
|---|---|
| Get an overview of input modules and how they're linked | Overview |
| Use a non-Photon interface to the system | Overview |
| Understand the source file organization for devi-* | Overview |
| Begin writing your own input driver | Writing an Input Device Driver |
| Learn about the data formats of protocol modules | Writing an Input Device Driver |
| Write a driver for a keyboard device | Writing an Input Device Driver |
| Write a driver for a touchscreen | Writing an Input Device Driver |
| Write a driver for a mouse | Writing an Input Device Driver |
| Combine device and protocol functionality in a single driver | Writing an Input Device Driver |
| Debug your driver | Testing and Debugging Your Driver |
| Look up a module function | Module Functions |
| Look up an interface function in the Input API | API Reference |
Building DDKs
You can compile the DDK from the IDE or the command line.
- To compile the DDK from the IDE:
Please refer to the Managing Source Code chapter, and "QNX Source Package" in the Common Wizards Reference chapter of the IDE User's Guide.
- To compile the DDK from the command line:
Please refer to the release notes or the installation notes for information on the location of the DDK archives.
DDKs are simple zipped archives, with no special requirements. You must manually expand their directory structure from the archive. You can install them into whichever directory you choose, assuming you have write permissions for the chosen directory.
Historically, DDKs were placed in /usr/src/ddk_VERSION directory, e.g. /usr/src/ddk-6.2.1. This method is no longer required, as each DDK archive is completely self-contained.
The following example indicates how you create a directory and unzip the archive file:
# cd ~
# mkdir my_DDK
# cd my_DDK
# unzip /path_to_ddks/ddk-device_type.zip
The top-level directory structure for the DDK looks like this:
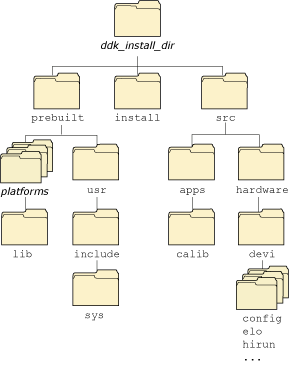
Directory structure for this DDK.

You must run: . ./setenv.sh
before running make, or make install.Additionally, on Windows hosts you'll need to run the Bash shell (bash.exe) before you run the . ./setenv.sh command.
If you fail to run the . ./setenv.sh shell script prior to building the DDK, you can overwrite existing binaries or libs that are installed in $QNX_TARGET.
Each time you start a new shell, run the . ./setenv.sh command. The shell needs to be initialized before you can compile the archive.
The script will be located in the same directory where you unzipped the archive file. It must be run in such a way that it modifies the current shell's environment, not a sub-shell environment.
In ksh and bash shells, All shell scripts are executed in a sub-shell by default. Therefore, it's important that you use the syntax
. <script>
which will prevent a sub-shell from being used.
Each DDK is rooted in whatever directory you copy it to. If you type make within this directory, you'll generate all of the buildable entities within that DDK no matter where you move the directory.
all binaries are placed in a scratch area within the DDK directory that mimics the layout of a target system.
When you build a DDK, everything it needs, aside from standard system headers, is pulled in from within its own directory. Nothing that's built is installed outside of the DDK's directory. The makefiles shipped with the DDKs copy the contents of the prebuilt directory into the install directory. The binaries are built from the source using include files and link libraries in the install directory.
Typographical conventions
Throughout this manual, we use certain typographical conventions to distinguish technical terms. In general, the conventions we use conform to those found in IEEE POSIX publications. The following table summarizes our conventions:
| Reference | Example |
|---|---|
| Code examples | if( stream == NULL ) |
| Command options | -lR |
| Commands | make |
| Environment variables | PATH |
| File and pathnames | /dev/null |
| Function names | exit() |
| Keyboard chords | Ctrl-Alt-Delete |
| Keyboard input | something you type |
| Keyboard keys | Enter |
| Program output | login: |
| Programming constants | NULL |
| Programming data types | unsigned short |
| Programming literals | 0xFF, "message string" |
| Variable names | stdin |
| User-interface components | Cancel |
We use an arrow (-->) in directions for accessing menu items, like this:
You'll find the Other... menu item under .
We use notes, cautions, and warnings to highlight important messages:
|
Notes point out something important or useful. |
 |
Cautions tell you about commands or procedures that may have unwanted or undesirable side effects. |
 |
Warnings tell you about commands or procedures that could be dangerous to your files, your hardware, or even yourself. |
Note to Windows users
In our documentation, we use a forward slash (/) as a delimiter in all pathnames, including those pointing to Windows files.
We also generally follow POSIX/UNIX filesystem conventions.
Navigation buttons
At the top and bottom of our HTML docs, you'll see some or all of these buttons:
| Use this button: | To move: |
|---|---|

|
To the previous part of the document. |

|
"Up" in the document:
|

|
To the keyword index. |

|
To the next part of the document. |
Technical support
To obtain technical support for any QNX product, visit the Support + Services area on our website (www.qnx.com). You'll find a wide range of support options, including community forums.
Copyright © 2000-2007, QNX Software Systems GmbH & Co. KG. All rights reserved.
|
|
|
|